Spray the glue, paste the stripes
Rib stripes are ready for template layout, they will be placed onto kraft paper guide, for fixing them at the arranged place, a little bit of glue is needed.Repositionable adhesive makes you easily re-arrange stripe positions once you are not satisfy with them, so it makes job done perfectly without difficulty.


Spray a thin layer of repositionable adhesive onto the kraft paper guide, spray evenly, but as little as possible, we need it help fix the rib, but also to reposition when need. Put it still for about 5 minutes, then place the stripes according to the guide. Don't mix 7 mm stripes and 5 mm stripes and don't get them at the wrong position.
I would paste 7 mm stripes first, then 5 mm stripes.

Ideally the gaps should be at the center of two stripes, but I found it hard to fulfill in such a limited space, so I would place stripes exactly by the guide lines, it is much easier to follow, and the result is the same.

Cut the shape with ribs
Ideally ribs should looks like what shows in the image below, each rib extends tips to the corner, they cover every corner, and help forming the folds.
As I mentioned before, I prefer complete ribs, with the help of CG software and plotting/cutting machine, it is not so hard to achieve, but if you plan to do that with bare hands, then I wish you best luck.

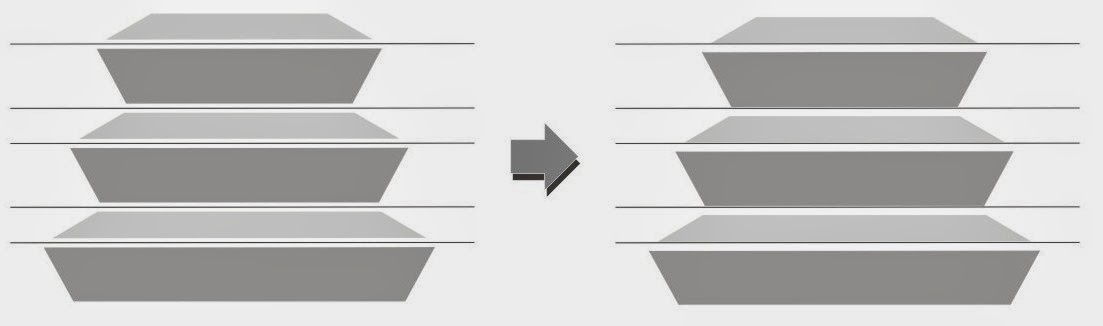
To simplify the building procedure, and to avoid stacking too many layers of ribs at corners, resulting unnecessary problem, many industrial produced bellows have simplify ribs like what shows at image below.

What our ribs will be cut into the shape similar to this.

1. Notice that ribs will not reach to the end of shape, so we need to mark the borders for these ribs. With zigzag ruler align by slant side of shapes, add two border lines on both shape A and B. These two inner lines in the shape are the borders for ribs.

2. Please be reminded again that the shape A/ B template are made with extended rib pairs, that is, what we really need for bellows is in the area within top and bottom lines, extended areas were left for gluing front /rear opening frame only.
The bottom line is the most important reference, for its length was defined by frame width or length, we must keep them precisely as desired, making sure that rear frame will fit into the bellows when gluing.
Do observe closely, you can find out that the rib shape on top of the bottom line, is the 5 mm stripe, the narrower one. As image shows, the yellows stripes.
And the rip shape just under the top line, is the 7 mm stripe, the wider one, as pink stripes show.

Now keep this in mind, place shape A template on top of the rib stripes, align the bottom line with the 5 mm stripes (yellow stripes in the image below), leave about 2 stripes underneath bottom line, as extend rib pairs. Since we have more stripes pasted as we need, so maybe some stripes will be left unused, that’s fine, they are supposed to be.
Double check that the stripe beneath the top line is 7 mm stripe (pink stripe in the image below), and leave two extend stripes for frame gluing.
What we cutting off is as grey area shown in the image below.


Rotate the stripes 180 degree, and get another rib pair stripes. Now 2 shape A rib pair stripes are done!

3. Do as step 2 instructs, make 2 shape B rib pair stripes.

Now four sides of rib pairs are all ready, next step is to paste them onto inner layer.

Be aware these four rib pair stripes are pasted on kraft paper with repositional adhesive, just temporarily keep them in the place, so handle them in gentle manner.
No comments:
Post a Comment